As requested, here's another favourite of mine - the Fiend!
An Odd Combination: The Fiend combines two archetypes, the archer and the shieldmage, into one fluid build. Although unconventional, this combination has some amazing synergy in that it lets you switch to your more defensive stance once enemies are near, and gives you lots of options for both long and close range.
Chaos: The Fiend is all about creating chaos on the battlefield, and with a mxiture of Illusion, Destruction and Block there are many ways to do so, disrupting enemy positions and turning them against each other.
No Alchemy!: While it's not a particularly unique trait, non-alchemy builds are in the minority of my collection so I thought this warrants a place here.
Where this devious hunter originated from is unknown, though the trail of blood and mutilation left in her wake is not hard to follow…
Said to once have been a priest of the divines, the Fiend renounced all worship of her former patrons when they left her to die at the hands of a murderous vampire. Quickly exacting revenge upon her assailant, though unable to find a cure for the disease, the Fiend quickly transformed into a deadly killer with an addiction to blood and chaos. Making her sworn enemies with the gods themselves for forsaking her when she needed them most, the Fiend is desperate for their destruction, dishonouring the Divines at every turn…
With the blood of the pure vampires of Skyrim flowing through her veins, nothing will stop this anarchic archer from domination and pandemonium...
Race: Breton Vampire
Stone: Atronach
Shouts: Become Ethereal, Slow Time
Stats: 4:3:3
Major Skills: Archery, Block, Illusion
Minor Skills: Smithing, Restoration, Destruction
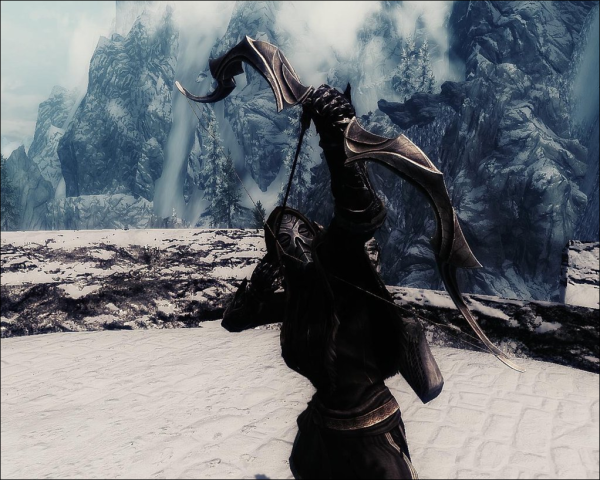
Weapons: Daedric Bow, Targe of the Blooded, Auriel's Bow
Apparel: Vokun, Archmage's Robes, Daedric Boots and Gauntlets
As you can see, it's a pretty simple skillset, but that allows for much more specialisation. Obviously, Archery and Block are the most important, fulfilling the key talents of archer and shieldmage respectively. Your arrows strike forth with the fury of a god, and your shield almost as much so. A truly devastating arsenal of weaponry will spell nothing but death for your enemies and pure fun for you: from eclipses created by Auriel's Bow, to bleeding from the Targe (how can this monster not be considered a weapon?), and finally to raw power from the signature Daedric Bow.
Despite the lack of any defensive skills besides Block, the Fiend still thrives in the thick of battle, creating absolute chaos amongst her foes. Illusion is chosen primarily for its frenzy effects, and with the Fiend's augmentations the master level spells actually become the most useful. Your opponents become your playthings, ferociously targeting their companions while you create even more chaos with your shield. Through your chosen perks, even Dragon Priests are susceptible to Mayhem, causing extreme havoc and making boss battles a breeze. And the anarchy element is only further augmented when factoring in your shield, which will be charging down opponents like an angry mammoth while their frenzied companions slaughter each other.
Destruction and Restoration become your other two chosen spell schools, and synergise brilliantly with Block and Illusion. Whirlwind Cloak will have enemies flying left right and centre, and works brilliantly in conjunction with Shield Charge, knocking back all foes unlucky enough to be nearby. Restoration provides the incredible Poison Runes, creating passive damage amongst enemies, slowly chipping away at their health while they chip away at each other's. The Targe of the Blooded and Poison Runes let you stack DoT while still being defensive. Due to the Rune Master perk being taken in Destruction, these runes can be cast at far ranges, allowing you to step away from the carnage and play dictator mode while your foes' life quickly diminishes. And with your aptitude in Restoration, you can even heal useful frenzied enemies, as well as yourself when in a fix. 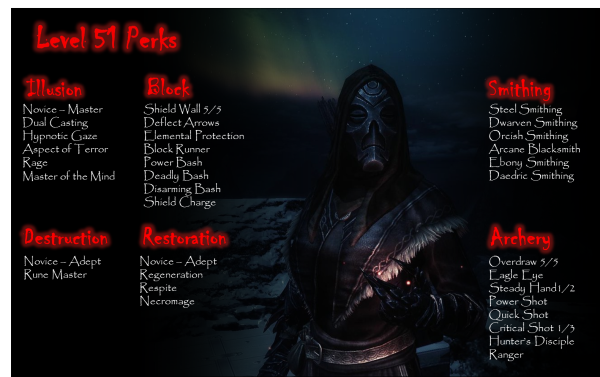
Smithing takes priority at earlier levels, with the key perk to aim for during this time being Daedric Smithing, which not only allows you to craft your armour and bow, but also to increase Vokun to legendary quality. For the Archery tree Quick Shot and Ranger are critical perks, practically doubling your effectiveness by increasing your speed and movement in battle. Master of the Mind is the final significant perk, as it allows your illusion spells to affect all types of enemies. Shield Charge, though not paramount, is certainly useful, but can be put off until later levels. Whirlwind Cloak functions in a similar way, although it won't always activate when needed, so Shield Charge is useful as a precaution when surrounded by tough foes.
Abilities
 Manipulation – The best way to open up combat. While under the effects of Become Ethereal, the Fiend has ample time to run into the centre of the fray and cast a dangerous spell with massive range, which instantly aggros all enemies in the vicinity. After using Manipulation you can go straight into a Charge to cause further chaos, or leave the heat of battle to safely fire arrows at a distance on your frenzied foes.
Requires: Become Ethereal, Mayhem
 Bleed – The Fiend’s most brutal technique. Utilizing the deadly combination of Targe, Poison Runes and a simple healing spell, the Fiend can stun lock single opponents while rapidly draining their health with a combination of deadly DoTs. Make use of Respite to heal your stamina when it gets low (you only need to heal a fraction to bash), then preserve the rest of your magicka for Poison Runes. Use against lone, tough enemies when you really feel like playing with your food.
Requires: Targe of the Blooded, Deadly Bash, Poison Runes, Respite, Healing
 Charge – Sometimes the simplest moves are the most effective. If you ever are surrounded by enemies, then Charge is the best way to escape, and create a bit of anarchy in the process. Casting Whirlwind Cloak will throw back any enemies who are in your immediate vicinity, and Shield Charge will bowl over any who stand in your way of escaping. Once you’ve escaped your enemies, following up with a Frenzy Rune will ensure that those who dared to face you will be forced to attack those closest to them; usually their downed friends.
Requires: Shield Charge, Whirlwind Cloak, Frenzy Rune (optional)
 Mobility – As a vampire, the Fiend possesses extreme speed and agility. With a combination of passives the Fiend can achieve a state of mind where her attacks are multiple times faster than her opponents, who are helpless to withstand the rain of arrows about to strike them.
Requires: Slow Time, Necromage, Ranger, Quick Shot
Creating Chaos
The Fiend has several approaches to combat which allow her to create chaos amongst her enemies. At later levels Manipulation is a great way to begin combat, but if you haven't got your master spells yet a simple Frenzy spell will do the trick from range. Frenzying the strongest enemy in the group can be a good idea to preserve magicka, and this lets you save your reserves for Bleed in case you get swarmed. Bleed is also great against single tough opponents - keep them stagger locked with constant bashes and healing with respite to keep your stamina up. Throw in some Poison Runes and they'll be taking lots of consistent damage while you're still protected. Turn Undead spells can be used at earlier levels as a supplement to Illusion spells before you get Master of the Mind, letting you get lots of free hits on fleeing undead.
Charge can be great as an opener but also as an escape. Using it can give you some room to breath and reposition, letting you shoot the enemies you just knocked down from afar. Mobility can also act as a way of closing the gap, and is particularly useful against tough opponents who can't be frenzied like dragons.
At early levels, Illusion and Archery are undoubtedly your greatest assets, with frenzy being the name of the game. Even the simple fury spell can be hitting up to level 20 with Dual Casting and Champion of the Night at earlier levels, letting you dominate all types of living foes. Remember to spread out shots equally on enemies to keep them all weakened rather than having a strong, singe surviving opponent to hassle with by the end of the frenzy. Make sure to target the tough foes first, since they'll pose the most trouble.
Poison Runes ensure that living enemies are constantly taking damage while frenzied and combined with the Targe and Slow Time shout it allows for massive amounts of DoT to be stacked by switching between bashes and runes. Deadly Bash makes the Targe beastly, rapidly damaging enemies' health, and Disarming Bash only further boosts the chaos factor by forcing enemies to either continue fighting with their fists or be at the mercy of their frenzied companions while chasing down their weapon. Respite synergizes brilliantly with bashing, and a simple healing spell will allow for further damage with the shield, or zooming in with the bow.
Roleplay
Due to her past, the Fiend is always going to be a torn and demented being. It’s just how far you take that depends on how you view your character. After the attack that turned priest into killer, the Fiend descended into vampirism and madness, intent upon showing her true nature as a god to the people of Skyrim. She sees the divines as the ones to blame for her disease, and that they turned their backs on one of their followers when she needed them most. As a result, anything you do must have a negative impact on the followers of the divines, or those who she deems to hold power they don’t deserve.
Desperate for attention and acknowledgement, the Fiend will go to any extent to see her recognized as a god. With an unquenchable thirst for dominance and power, she brutally kills any who would dare oppose her. This means that the Dawnguard, the Vigil of Stendarr, and any holy men and women are your targets, because they uphold “false” gods in her eyes. This also includes defiling the divine shrines in any way possible, to further insult the gods for the wrongs they did her. Mortals are nothing but the Fiend’s playthings, and their only purpose is to worship her, or die for their insolence.
Because the people of Skyrim cannot actually worship you, and you will probably make more enemies than friends playing this build, you soon come to the conclusion that the mortals do not deserve you as a god, and instead deserve only long and painful deaths for not following you. This is when you really start to show your chaotic side, and ruthlessly slaughter innocents simply to make a point. Act the part of the arrogant vampiric noble at all times, putting even the Thalmor to shame with your supreme haughtiness. The Fiend does what she wants, when she wants, and nobody can stop her doing it. Later on in your playthrough you become more a force of nature than a simple enemy; you cannot fight back against the Fiend no more than you can stop a storm from blowing.
Credits:
Morta and CND for the brilliant screenshots.
Replies
So scary
Holy shit scary is right.
Great video as always. Can you provide the armor/weapon mods you used? I 've been thinking about giving this build a "kill everything" run and this look sold me. (I think i recognize the dragon mask mod)
A couple of mods went into the characters appearance. The mask is the “Jack of Blades mask” from a mod of the same name.
The Hood comes from a mod called black mage armors, a mod which replaces archmage Robes wth a variety of darker robes and armor pieces.
the armor is the Ritual Armor of Beoithia from Innersivs armors. I use another mod called “Artifact Disenchantment to transfer the enchantment from the arch mage Robes over to the armor. No skill in enchanting necessary.
Thanks Curse - I have all of those installed except the mask. That mask is terrifying - another option (if anyone else is as obsessed with appearance mods as I am) is one of the masks from Unique Dragon Priest Masks--Krosis (on the left below) is especially terrifying. Vokun is the one in the middle, also terrifying. What I am trying to say is that masks are terrifying.
Anyway, I've loaded up the Bleak ENB and I am ready to go..
Oh ho. There’s just so many scary attire options for this character.
Awesome vid and screenshots, adding some into the build now. I love how scary that armour combo is, it really captures the look that I was trying to achieve in vanilla.
Glad you like it raid. If you want to add the video into your build simply grab the embed code for it off of YouTube.
The video for this build has only been published for 24hours, and its already the most popular build on the sites YouTube channel.
-
1
-
2
-
3
-
4
of 4 Next